Floating Installation Instruction
Jan 5, 2026, 15:30 PM
Bamboo flooring can be installed by 3 different methods, including nail-down with sub-floor, glue-down on underlay and floating.
A floating floor is installed without requiring nailing, stapling or gluing to another surface. It is clean installation, with very little room for mistakes. People can snap floating floor together and simply lay on top of the sub-floor. Once the first row is put down, installation is relatively simple.
There are 9 steps to make the floating installation, from beginning to end. Floating installation instruction is helpful for you to make correct installation by DIY, without professional installer invovled.
- Step 1 Prepare the Floor for Installation.
- If installing the floor over concrete, lay 1/4" (6mm) plastic sheeting over the concrete and overlap the seams by at least 8" (20cm). If the concrete is below grade, bring the plastic at least 4" (10cm) up the wall. You will trim it off at the height of the baseboard once the wood flooring has been installed. Roll out the manufacturer's recommended foam underlayment, but do not overlap the seams.

- Step 2 Snap a Chalk line and Nail Guideboard
- Add the width of the first two rows to the size of the expansion gap (The distance between the edge of the last plank in a row to the wall). Check manufacturer guidelines for gap distance. Snap a chalk line this distance from the wall and nail a straight board, temporarily along it, to align the flooring.

- Step 3 Lay the Starter Row
- Apply a bead of glue to the tongue on the end of the first plank following the manufacturer's specifications. Put the grooved edge against the guideboard. Put the grooved end of the next plank against the glued tongue. Seat it by tapping with a hammer and a tapping block that's recommended by the manufacturer. Leave the recommended expansion gap. Apply glue to the end tongues with each additional board to complete the row.

- Step 4 Complete the First Row
- Cut the last board of the first row to fit, leaving the recommended expansion gap. Push the board into place with a pry bar, protecting the wall with a putty knife or a scrap piece of wood. A pull bar can also be used for this task.

- Step 5 Install the First Plank on the Second Row
- Begin the second row with the piece cutoff from the first row. This keeps the ends of the planks from lining up, creating both a stronger and better-looking floor. Trim the piece of cutoff, if necessary, so the end will be 24" (61cm) from the end of the neighboring plank. Run a 1/8" (3mm) bead of glue along the tongue of the previous row, put the cutoff against it, and seat with a tapping block.

- Step 6 Install the Remaining Floor
- Apply glue to the tongues and nestle each board against its neighbour. Seat the edge with a tapping block then seat the end. Cut the last piece of the row to fit, leaving the proper expansion gap between the plank and the wall. Push the last board of each row into place using the same method from Step 5.

- Step 7 Complete the Last Row
- Measure and cut planks to the width of the distance from the second last row to the wall, allowing for the expansion gap. Rip the boards to measured width to be cut and temporarily put them in place. If the irregularities in the wall result in an expansion gap that is too small, scribe the boards.

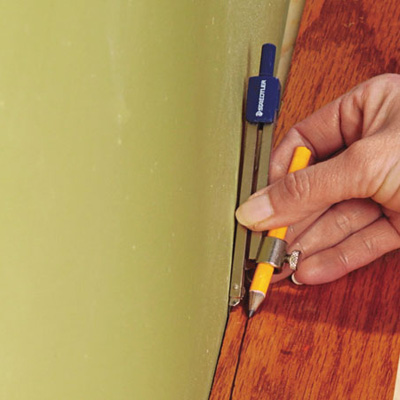
- To scribe:
- i. Hold the edge piece parallel to the layout line, setting where it touches the wall at least at one point.
- ii. Set a compass to the amount you want to remove.
- iii. Cut along the line with the saw appropriate for engineered flooring. Bevel the cut so the blade trims more off the bottom than the top.

- Step 8 Remove the Guideboard
- Remove the guideboard and install the rows needed to fill in the resulting space. When you reach the row against the wall, rip it to width, as in Step 7, and scribe, if necessary (See Step 7). Install the boards and avoid walking on the floor for at least 8 hours until the glue dries.

- Step 9 Install Baseboard
- Install baseboard around the room to cover the expansion gap and protect the walls.


 皖公网安备 34180202000049号